Smart Switch - Automatic Switch With Voice Activation
29/06/2020 Views : 751
WIDYADI SETIAWAN
Introduction
Use of the switch is common in households to turn on and turn off electronic devices, such as lights, televisions, air conditioners, etc. Technological developments make it possible to replace conventional switches with automatic switches. Understanding the automatic switch here to turn on the switch/drain the flow of electricity without the presence of mechanical elements from the switch that is moved by human hands. Human involvement in the on-off switch is done indirectly, such as using a remote device. In general, the automatic switch will use a wireless connection (Bluetooth, Wifi, InfraRed) as a transmission medium from a remote device. On the remote device itself can be activated by pressing the buttons or even by using voice commands, as illustrated in Figure 1.
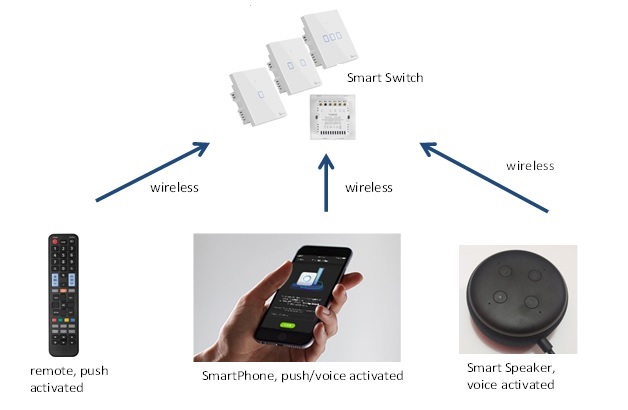
Figure 1. Illustration of automatic switches and remote devices
In this article we will discuss automatic switches that are connected via remote devices that are activated by voice. Use of Alexa Echo Dot, one of the smart speaker products from Amazon that is used as a remote device.
Smart Switch
As mentioned in the introduction, this article will explain the technical aspects of automatic switch with voice activation. For remote devices using Alexa Echo Dot, which is able to recognize human voices which for now is still limited to several languages, one of them is English. By saying wake up call, then followed by instructions to activate / deactivate the switch is the ability of the smart speaker that is used to receive voice input. On the switch side itself uses the NodeMCU ESP8266 microcontroller as a controller that will change the input from the smart speaker to trigger on or off the switch. NodeMCU microcontroller requires a 3.5-5 volt power supply (can be supplied from the adapter) and as a NodeMCU microcontroller output is controlling the relay so that the condition is on or off. The relay itself can be supplied from the microcontroller pin by 5 volts. These three devices, the NodeMCU Microcontroller, adapter and Relay are placed in a switch-shaped container. An overview of the smart switch designed is shown in Figure 2.
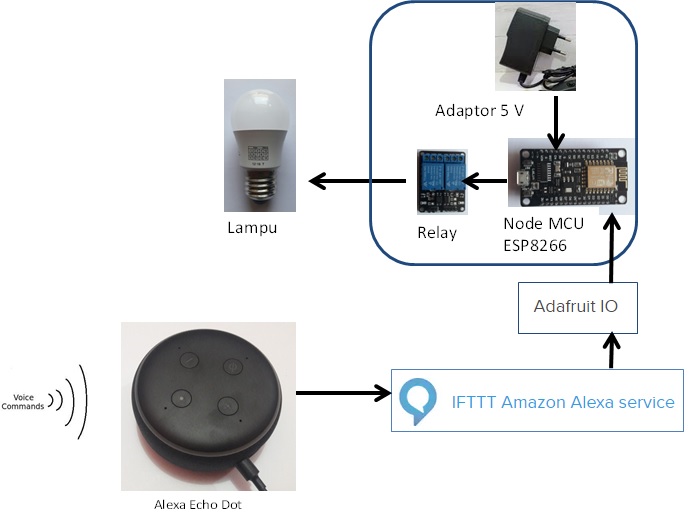
Figure 2. Smart Switch with Voice Activation
The first step is to insert the program/upload into the NodeMCU microcontroller using the scripts available on the Adafruit MQTT Library ESP8266 Example, one of which we can get from https://www.ic.unicamp.br/~celio/mc853/wifi/mqtt_esp8266.inno.
The second step is to use a third party service from ifttt.com is a web services that can connect the Application that we use (Alexa Echo Dot) with our Device (Microcontroller NodeMCU). This service is called "if this then that" (IFTTT) facilitates applications in the MQTT protocol in order to communicate with the NodeMCU Microcontroller which has been filled with MQTT protocol based programs for its communication. MQTT is a protocol used in internet of things applications that is more popular than the HTTP protocol for using IoT.
The third step uses the MQTT broker facility from io.adafruit.com which bridges from the Amazon Alexa IFTTT service with the NodeMCU Microcontroller Device, the MQTT broker is responsible for sending all messages from the server to the client or vice versa. Adafruit is also a web service which can read data from Alexa Echo Dot, store data and display data. For applications that we make this service will send data to the NodeMCU Microcontroller Device. The data sent is data 0 (symbolizing the switch off) and data 1 (symbolizing the switch on).
Conclusion
We can make Smart Switch with voice activation for our home using the IFTTT web service and adafruit which is free of charge. Packaging of three switch devices namely adapter, NodeMCU microcontroller and relay can be made by well-designed Box, resembles the shape of a switch and later we can print with 3-dimensional printers. Make sure the internet connection is reliable and stable to implement this smart switch.
Explanation in the form of video can be seen on the following youtube link: